As a pet owner, I’ve learned that keeping our furry friends happy often means dealing with a little mess. One of the most common challenges is protecting the floor under the litter box. Whether it’s clumping litter or the occasional spill, these can quickly turn into a cleaning nightmare if not addressed properly.
I’ve discovered that a few simple strategies can make all the difference in maintaining a clean and tidy space. From choosing the right materials to innovative solutions, there are plenty of ways to safeguard your floors without sacrificing your cat’s comfort. By taking a proactive approach, you can ensure your home stays fresh and your feline remains content.
DISCLOSURE: https://betterbehavedcat.com/ is supported by you the reader so if you buy any products featured on this site I may earn an affiliate commission. As an Amazon Associate I earn from qualifying purchases. Read my full disclosure here.


Why Protecting Your Floor Under the Litter Box Is Important
Keeping floors safe from litter mess is essential. I see this every day with my cat, Charlie. Without protection, litter granules can scatter. When these get tracked around, it creates an endless cleaning cycle.
Moisture from litter box mishaps can seep into flooring. This leads to stains or even damage if left unattended. Unfortunately, not all materials are stain-proof. Rugs and carpet suffer the most but even tiles aren’t safe.
Using a barrier under the box prevents costly repairs. I use a mat designed for easy cleanup. It’s absorbent and simple to shake out. Protecting your floor means more than just aesthetics—it’s about preserving your living space integrity.
Common Problems with Unprotected Floors
Unprotected floors suffer from issues when the litter box sits directly on them. I’ve had my share of headaches with Charlie’s litter spreading beyond the box.
Litter tracking is a major concern. Cats often drag litter on their paws after using the box, leading to scattered debris throughout the house. It sticks between floorboards or on carpet fibers, increasing cleanup efforts considerably.
Moisture damage occurs when mishaps aren’t immediately addressed. I’ve noticed stains from moisture, which warps wood or affects tile grout. Addressing damage from each accident feels like an endless battle.
Odor absorption becomes a problem for porous flooring like wood. Despite my regular cleaning, unpleasant odors linger when they’re absorbed by the floor material. This makes spaces less inviting and requires extra deodorizing measures.
Scratches and abrasion can happen when a cat’s claws or shifting litter box movements wear down the protective layer of a hard floor. With Charlie, I’ve observed tiny scratches that accumulate over time, affecting the floor’s appearance.
These problems highlight the importance of protecting your floor under the litter box to save time and maintain your home’s integrity.
Types of Floor Protection Solutions
Keeping floors safe from litter box messes involves a few strategic solutions. Over the years, I’ve tried various methods to shield my floors from Charlie’s litter antics.
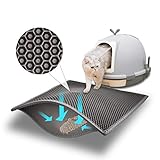
Waterproof Mats
Waterproof mats create an effective barrier against spills. These mats capture litter tracked outside the box and absorb small accidents without letting moisture seep through. My current mat has grooves to trap the litter, making cleanup a breeze.
Plastic Liners
Plastic liners provide another layer of protection, especially under the litter box. They’re excellent for shielding the floor from any leakage that may occur. I find them easy to clean; a quick wipe now and then keeps them in top shape.
Tiled Areas
Tiled areas work well as a natural defense against moisture and stains. Located under Charlie’s litter box, tiles resist damage, allowing for easy sanitation. When a spill happens, I simply mop up without worrying about long-term effects.
Choosing the Right Protection for Your Home
Selecting the proper protection for your floor under a litter box involves several key factors. I’ve dealt with these firsthand with my cat, Charlie, and found practical solutions that work.
Consider Your Cat’s Habits
Understanding the mess your cat creates is essential. Charlie, for instance, loves to dig, which kicks litter everywhere. Cats like him benefit from high-sided litter boxes that help minimize scatter. If your cat is messy or tends to spill, opt for large, absorbent mats that capture excess litter and wetness efficiently.
Evaluate Your Flooring Type
Different flooring types need different protections. I cover wooden flooring with waterproof rubber mats to guard against moisture damage, as hardwood can warp or stain easily. On tiled surfaces, I use plastic liners under the litter box since tiles resist stains and are easy to wipe. Understanding your flooring needs will guide your choice of materials, ensuring effective protection.
DIY vs. Store-Bought Solutions
Sometimes I find myself weighing DIY against store-bought solutions for protecting my floor from Charlie’s litter box mess. Both options offer unique advantages, so it’s essential to evaluate them based on budget, effectiveness, and personal preference.
DIY options, like crafting a mat from old towels, are budget-friendly. On the downside, absorbency and durability might fall short. I once used an old bath mat, which worked temporarily but needed frequent washing. If you’re handy, creating a custom mat from waterproof fabric can offer tailored protection. Just ensure the materials withstand moisture and frequent cleaning.
In contrast, store-bought solutions often come highly recommended for their efficiency and convenience. Waterproof mats and liners are pre-measured to fit around litter boxes and boast absorbent layers that lock in moisture and odors. I picked up a specialized mat for Charlie’s area, which surprisingly reduced stray litter and protected my wooden floor efficiently. These items offer peace of mind but require a slightly higher upfront investment.
Choosing between DIY and store-bought solutions depends on your specific needs and willingness to invest time or money. It’s all about finding what works for you and your furry friend.
Tips for Maintaining a Clean Area
Keeping the floor under the litter box clean involves consistent routines and effective techniques. Here are some tried-and-true tips from my experience with my cat, Charlie.
Regular Cleaning Routine
Daily maintenance is essential. I scoop out used litter each day to prevent odors from building up. Every week, I replace the entire contents of the litter box and wash it with a mild detergent. With Charlie being quite the digger, checking for any stray litter around the box each day keeps the area tidy.
Deodorizing Techniques
Using a deodorizer helps control any lingering smells. I sprinkle a bit of baking soda at the base of the clean litter box. Baking soda is great for neutralizing odors. Sometimes, I use a pet-safe spray to freshen the area. Charlie seems more comfortable when it’s clean and odor-free.
Conclusion
Protecting the floor under the litter box is more than just a matter of cleanliness; it’s about preserving your home’s integrity and ensuring a comfortable environment for your furry friend. By choosing the right materials and solutions, you can effectively manage litter spills and moisture issues, keeping your space tidy and odor-free. Whether you opt for DIY methods or store-bought products, the key is to find what works best for you and your pet. Regular maintenance and proactive measures will go a long way in reducing the hassle of cleaning and preventing damage, making life easier for both you and your cat.
Last update on 2025-04-27 / Affiliate links / Images from Amazon Product Advertising API